
Curb Appeal After Dark: Using Low Voltage Lighting to Highlight Your Home
What if your home's best features only came to life after sunset? The right low-voltage lighting can transform your property from ordinary to extraordinary when the sun goes down.
Strategic outdoor lighting boosts your home's nighttime curb appeal. It creates a welcoming atmosphere and showcases your architecture and landscaping.
This popular method uses a transformer and plugs into a standard outlet. It is a safe and energy-efficient system for highlighting your yard.
This guide will walk you through everything you need to know. We cover components, planning, installation, and creative ideas.
Proper outdoor illumination extends your living space. It also increases security and can boost your property's value.
Key Takeaways
Outdoor lighting dramatically improves your home's appearance and safety at night.
Low-voltage systems are safe, easy to use, and energy-efficient.
Planning your layout is crucial for achieving the best aesthetic results.
This type of illumination can make outdoor spaces usable after dark.
A well-lit landscape can increase your property's overall value.
This article serves as a complete buyer's guide for homeowners.
You will learn about different products, from path lights to spotlights.
Introduction: Transforming Your Home’s Nighttime Personality
Nighttime presents a unique canvas for homeowners to redefine their property's appeal and atmosphere. When the sun sets, your home's daytime character gives way to a new, dramatic potential.
Thoughtful exterior illumination crafts this new personality. It shapes how you and your guests experience your space after dark.
Well-designed low voltage lighting does more than just brighten an area. It evokes a deep sense of warmth and welcome. It makes a property feel secure and inviting the moment you arrive.
This is where a low-voltage system shines as the ideal tool. Its flexibility allows for creative placement. Its inherent safety makes it perfect for DIY projects around the yard.
A successful plan serves two main purposes. It enhances the beauty of your architecture and plants. It also improves practical safety and security along walkways and entries.
The best results come from intentional design, not random placement. Think about creating layers of light and clear focal points. This approach adds depth and interest to your entire landscape.
You will learn about system basics, fixture selection, and layout planning. Modern smart controls add another layer of convenience and customization.
View your yard as a blank canvas. Strategic illumination is your brush for painting with light and shadow.
Understanding these dual goals is the first step. It guides every other choice you will make for your outdoor lights.
A great landscape lighting plan blends these elements seamlessly. It turns a dark property into a stunning, usable extension of your home.
What is Low Voltage Lighting? A Safe and Efficient Foundation
Before selecting fixtures, it's crucial to grasp the core technology that makes modern outdoor illumination so accessible. This system provides a safe and energy-smart foundation for your project.
It operates on a significantly reduced electrical current. This fundamental difference shapes its safety, ease of use, and overall performance.
Low Voltage vs. Line Voltage: Understanding the Key Difference
Standard household outlets deliver what's known as line voltage. In North America, this is 120 volts, while other regions typically use 230 volts.
In contrast, a specialized landscape system runs on just 12 or 24 volts. This massive reduction in power is the key to its user-friendly nature.
The lower power level drastically minimizes the risk of severe electric shock. This makes it a safe choice for DIY installation and for use near gardens or water features.
The Essential Transformer: How a PSU Powers Your System
The magic happens inside the power supply unit (PSU). This transformer is the heart of the entire setup.
It plugs into a standard outdoor outlet. Its job is to step down the high line current to the safe 12 or 24 volts your fixtures need.
Transformers come in different wattage capacities, like 40W or 95W. You must choose one with enough power to handle the total wattage of all your products.
This efficiency is often paired with LED technology. These bulbs use very little energy and produce minimal heat, saving you money.
A complete kit includes the transformer, weatherproof cable, and various fixtures. Understanding this simple trio is your first step to a beautiful, illuminated landscape.
Top Benefits of Choosing a Low Voltage Landscape Lighting System
A well-planned outdoor lighting system delivers a powerful combination of beauty, safety, and savings. This approach to illumination offers distinct advantages over traditional methods.
Homeowners gain more than just a pretty glow. They create a functional, secure, and inviting extension of their living space.
Safety stands as the foremost advantage. A 12-volt system presents a minimal electrical hazard.
This is crucial for installations in damp garden beds or near water features. You can handle the wires and fixtures with confidence during setup.
Energy efficiency leads to significant cost savings. Modern LED products consume up to 80% less power than old halogen bulbs.
They convert most of their energy into light, not heat. Your monthly electricity bill will reflect this smart efficiency.
Ease of installation makes this a popular DIY project. The components are modular and user-friendly.
You can start with a simple kit and expand it over time. Repositioning path lights or spotlights is straightforward if your design needs change.
Design versatility is another major perk. A wide range of fixture styles exists for every task.
You can choose discreet well lights for uplighting trees. Elegant bollards can define a garden border with soft beams.
Durability ensures your investment lasts. Outdoor-rated fixtures are built to withstand rain, snow, and sun.
LED bulbs boast lifespans of tens of thousands of hours. You won't be constantly replacing lamps.
Enhanced home security is a practical benefit. A well-lit exterior is a proven deterrent to intruders.
Illuminated pathways and steps also prevent trips and falls. This creates peace of mind for your family and guests.
Finally, professional-grade illumination boosts your curb appeal and property value. It highlights your home's best architectural and landscape features.
This aesthetic upgrade makes a strong impression day and night. It transforms your property into a standout in the neighborhood.
Essential Components of a Low Voltage Lighting Kit
Every successful landscape lighting project relies on a handful of core hardware components. Understanding these parts is the first step to a reliable and beautiful setup.
Four main items form the foundation of your system. You need a power supply, cable, connectors, and the fixtures themselves.
Each piece has a specific job. The table below breaks down their roles.
The Power Supply Unit (PSU): Calculating Wattage for Your Needs
The transformer is the heart of your setup. It plugs into a standard outdoor GFCI outlet.
Its job is crucial. It converts 120V household power to a safe 12 or 24 volts.
Always choose a weatherproof model designed for exterior use. Placement should be convenient but discreet.
Sizing the transformer correctly is vital. You must calculate the total wattage of all fixtures you plan to connect.
First, add up the wattage listed for each product. Then, add a 20% buffer to this sum.
This buffer ensures longevity and prevents the transformer from running at maximum capacity.
Consider a real-world example. Philips Hue offers a 40-watt power supply.
Their Lily spotlight and Calla pedestal light both use 8 watts each. You could power three Lily lights (24W total) and two Calla lights (16W total).
This sums to exactly 40 watts, perfectly matching the PSU's capacity.
Cables and Connectors: Linking Your System Together
The cable is the circulatory system, delivering power from the source. The most common types are 12/2 or 10/2 gauge.
Thicker cable (like 10/2) is better for longer runs. It helps prevent voltage drop, which causes fixtures at the end of the line to dim.
Connectors are just as important as the wire itself. They must create a perfect seal against moisture.
Waterproof wire nuts with grease filling are a classic choice. Gel-filled splice connectors are also highly effective.
Many modern kits use proprietary quick-connect systems. These allow for tool-free, guaranteed waterproof connections.
Most starter kits include sufficient cable and connectors. Understanding these parts is key for future expansions or troubleshooting your layout.
A Buyer’s Guide to Low Voltage Lighting Fixture Types
The magic of a well-lit yard lies in choosing products that match each task perfectly. Your fixtures are the tools that sculpt light and shadow across your property.
They are typically grouped by their primary function: guidance, accent, safety, and ambient illumination. Selecting the right style for each area enhances both beauty and practicality.
This guide breaks down the most common categories. You will learn where and how to use each one for maximum impact.
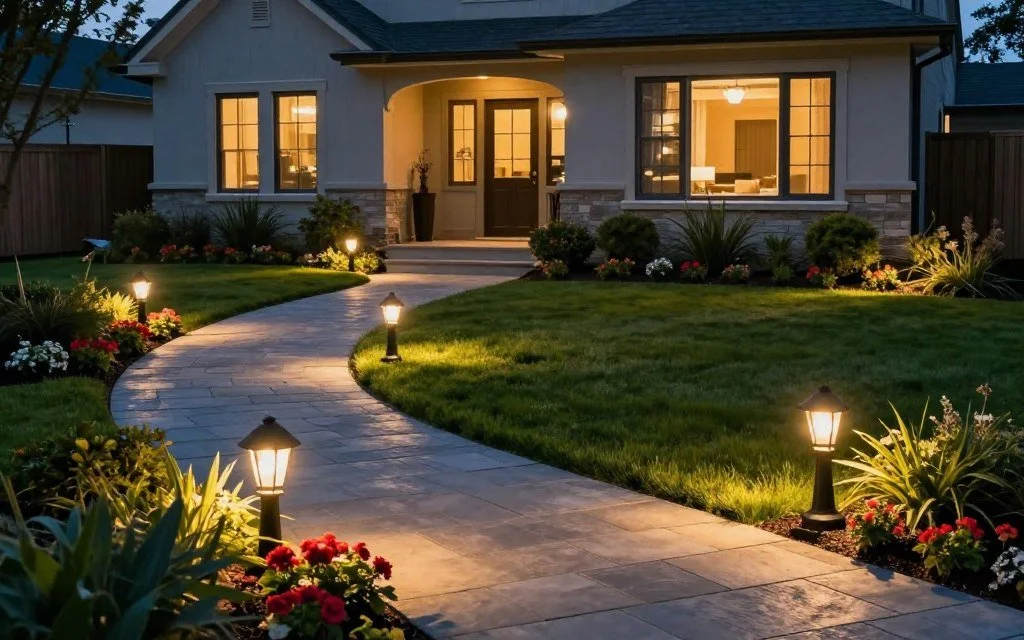
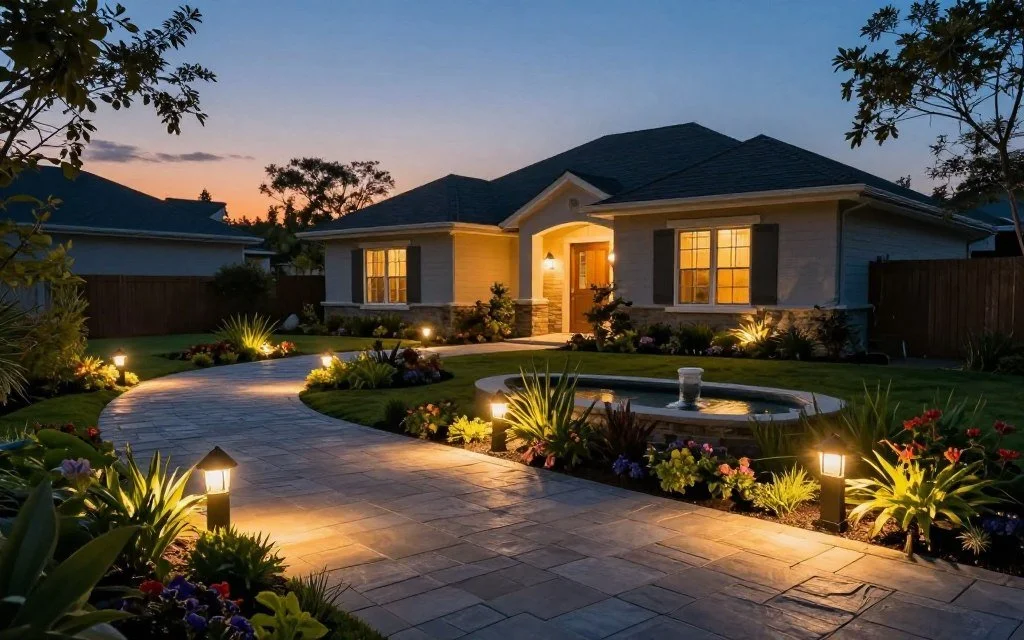
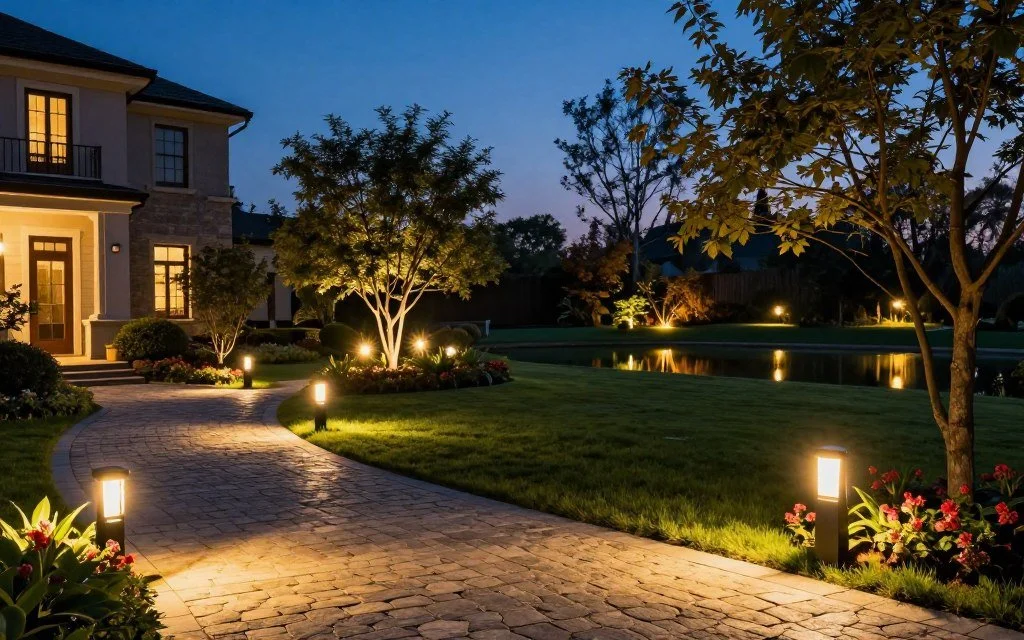
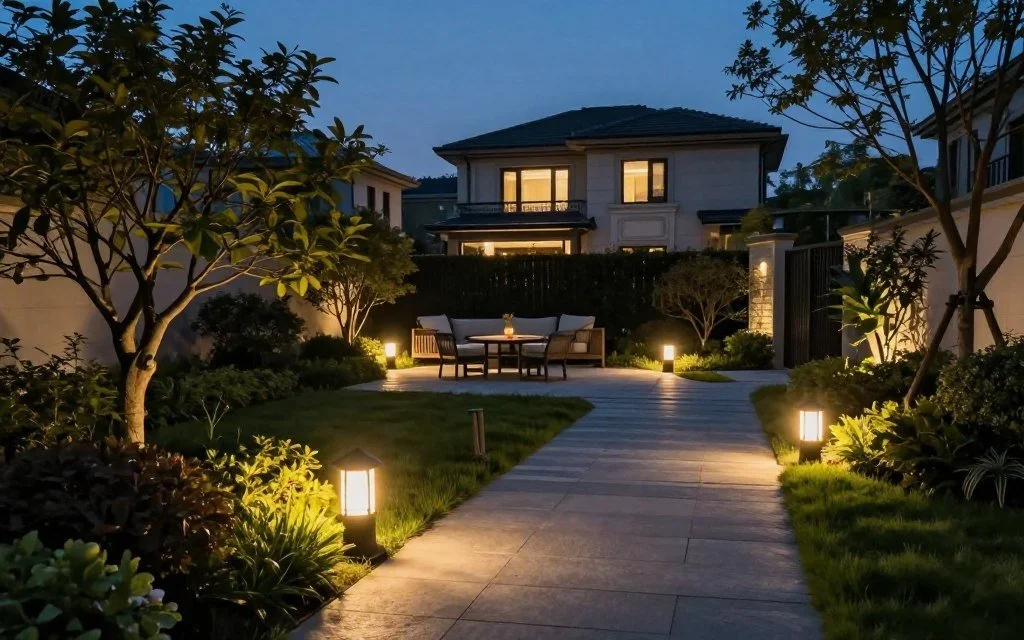
Path Lights and Bollards: Guiding the Way
These short, standalone fixtures are designed to line walkways and borders. They provide safe navigation and subtle illumination after dark.
Styles range from classic lanterns to modern cylindrical bollards. Their light is usually directed downward to minimize glare.
Place them every 6 to 8 feet along a garden path. This creates a rhythmic, inviting guide for guests.
For a clean look, choose a finish that blends with your landscape. Black or bronze works well in most gardens.
Spotlights and Floodlights: Accenting Features
Use these to draw attention to your property's best elements. A spotlight produces a narrow, intense beam.
It is perfect for highlighting a single tree trunk or a garden statue. This creates a dramatic focal point in the yard.
Floodlights cast a much wider wash of light. They are excellent for illuminating a broad wall surface or a large shrub.
Creative techniques include silhouetting. Place a spotlight behind a plant to cast its shadow on a wall.
Another method is grazing. Position a fixture close to a textured wall to emphasize its surface details.
Step and Deck Lights: Enhancing Safety and Ambiance
These fixtures are all about preventing trips and falls. They add a soft glow to vertical surfaces.
Step lights are often recessed into stair risers. They light each tread clearly for secure footing.
Deck lights can be mounted on railings or posts. They define the edge of an elevated space beautifully.
This category merges function with atmosphere. It makes outdoor stairs and decks usable and inviting at night.
In-Grade and Well Lights: Creating Subtle Uplighting
For a truly hidden light source, look to in-grade fixtures. They are installed flush with the ground or pavement.
A well light is a type of in-grade fixture with a protective housing. It is buried so only the light lens is visible.
Their primary use is uplighting. Point one upward into the canopy of a tree or across a broad shrub.
This technique creates fascinating shadows and textures on walls and fences. It adds depth and drama to your landscape.
These products are ideal for modern, minimalist designs. They keep the focus on the effect, not the fixture itself.
When selecting any fixture, consider its finish. Black and bronze offer a timeless, subtle look.
White or brushed nickel can complement contemporary home architecture. The right choice ensures your system looks intentional day and night.
Planning Your Lighting Layout: A Step-by-Step Strategy
Your property's after-dark transformation begins with a clear, step-by-step lighting blueprint. A thoughtful plan is crucial for a cohesive and effective design.
Randomly placing fixtures rarely creates the beautiful scene you imagine. A strategic layout ensures every beam serves a purpose.
Step 1: Define Your Goals (Safety, Security, or Aesthetics)
Start by identifying your primary objectives. Is the main need to illuminate a dark walkway for safety?
Maybe you want to deter unwanted visitors with security beams. Perhaps your focus is showcasing a beautiful garden for pure aesthetics.
Most projects blend all three goals. Knowing your priority helps guide every subsequent decision.
Step 2: Sketch Your Property and Identify Key Features
Grab a pencil and paper. Create a simple scale drawing of your yard.
Mark the house, trees, pathways, and water features. Don't forget seating areas and architectural details.
This bird's-eye view is your design canvas. It helps you visualize relationships between elements.
Step 3: Select Fixture Types for Each Zone
Now, assign specific products to each area on your sketch. Use path lights to line the main walkway.
Choose spotlights to highlight the front facade of your home. Consider deck lights for the patio perimeter.
Matching the right fixture to its task is key. This creates layers of illumination for both function and beauty.
Step 4: Map Your Cable Runs and Transformer Placement
This technical step ensures reliable performance. Plan the cable path from the power supply to each fixture.
Aim to minimize total cable length and avoid major obstacles. Long wire runs can cause voltage drop, making distant lamps dim.
Place your transformer close to an outdoor power outlet. A central location helps shorten cable runs.
Before burying any wires, do a night test. Temporarily place your fixtures and turn the system on.
Walk around your yard to see the effect. Adjust angles and positions until the scene looks perfect.
This trial run is the best way to finalize a brilliant landscape plan.
Installation Basics: How to Set Up Your Low Voltage Lights
Setting up your outdoor low voltage lighting is a straightforward process that rewards careful execution. With your plan in hand, you can transform your yard into a beautifully illuminated space.
This guide walks through the core steps for most DIY kits. You will learn how to position fixtures, run wires, and make secure connections.
Always start by gathering all necessary tools and materials. Having everything ready saves time and prevents interruptions.
Step 1: Positioning Fixtures and Laying Cable
Begin by placing your fixtures according to your layout sketch. Use temporary stakes or holders to mark each spot.
This allows you to visualize the final effect before making anything permanent. Walk around to see the spacing from different angles.
Next, lay the main cable along the planned route. For a clean look, bury it in a shallow trench two to three inches deep.
You can also run it along the surface, securing it with landscape staples. Leave some extra wire at each fixture location.
This slack lets you adjust the position later if needed. Ensure the cable path avoids sharp bends and major obstacles.
Step 2: Connecting to the Transformer (PSU)
Now, make the electrical connections. First, strip about half an inch of insulation from the wire ends.
Use waterproof wire connectors to join each fixture's leads to the main cable. Twist the wires together firmly before sealing the connector.
For smart systems like Philips Hue, note an extra requirement. Each fixture must be within 50 feet of another Hue product or the Bridge.
This maintains a strong Zigbee mesh network for reliable app control. Follow the manufacturer's guidelines for your specific products.
Finally, connect the main cable to the transformer's output terminals. Match the positive and negative wires correctly to observe polarity.
A secure connection here ensures consistent performance across all your lights.
Step 3: Plugging In and Testing the System
Plug the transformer into a GFCI-protected outdoor outlet. This type of outlet is a crucial safety feature for any exterior electrical project.
Turn on the power supply and walk your property. Check that every fixture illuminates as expected.
This is the time to fine-tune angles and beam directions. Adjust spotlights to highlight architectural details perfectly.
Reposition path lights to create even guidance along walkways. Once you are fully satisfied with the test, proceed to finalize the installation.
Bury any exposed cables neatly in their trenches. Secure each fixture permanently in the ground or on its mounting surface.
For smart products, complete the setup by adding each light to your control app. This integrates them into your automated schedules and scenes.
Following these steps ensures a safe and professional-looking result. Your new landscape illumination will be ready to enjoy for years to come.
Creative Lighting Techniques and Ideas for Maximum Impact
The true artistry of outdoor illumination emerges when you move beyond basic placement. Professional designers use specific methods to sculpt with beams and shadows.
These advanced approaches create depth, drama, and emotion in your yard. Layering multiple techniques results in a rich, multi-dimensional scene.
Architectural Highlighting: Washing Walls and Grazing Textures
Two distinct methods can make your home's exterior stand out. Wall washing uses a broad, even beam to illuminate a large surface.
This technique minimizes shadows and creates a clean, uniform glow. It is perfect for showcasing a smooth stucco or siding wall.
Grazing is the opposite approach. Place a fixture very close to a textured surface like stone or wood.
The light skims across the material, emphasizing every ridge and groove. This adds incredible depth and character to your facade.
Consider directional beams for shadow art on blank walls. Deck roof spotlights can wash a patio ceiling with soft light.
Classic mounted fixtures beside a door provide both safety and accent. These methods turn your architecture into a nighttime feature.
Path and Safety Lighting: Illuminating Walkways and Steps
The goal here is even guidance without harsh glare. Stagger fixtures on alternating sides of a path for visual interest.
Modern step lights recessed into risers provide clear definition. They ensure safe footing on stairs after dark.
For a mystical effect, use path lights with downward-facing shades. This casts soft pools of illumination along a garden walk.
You can also highlight bordering plants with these same fixtures. Alternate their placement to create a rhythmic, inviting guide.
Under-tree step lights prevent tripping on roots or uneven ground. Always aim beams away from direct eye level for comfort.
Silhouetting and Shadowing: Using Plants for Dramatic Effect
These techniques transform ordinary plants into dramatic art. Silhouetting places a bright source behind a shrub or tree.
The object appears as a dark shape against a lit wall. This creates a striking, graphic element in your landscape.
Shadowing uses a side angle to cast elongated shapes. The result is a playful pattern that moves with the breeze.
Try hiding a fixture behind a large ornamental grass. The leaves will glow from within, creating a magical halo.
Abstract lantern positioning can cast fascinating shadows. Experiment with distances to control the sharpness and size of the shapes.
Water Feature Lighting: Adding Sparkle to Ponds and Pools
Water and light combine for a truly enchanting effect. Submersible fixtures are designed to sit safely at the bottom of a pond.
They create a gentle, upward glow that makes the water seem to shimmer. Aiming a spotlight at a fountain or waterfall adds sparkle.
For pools, directional underwater beams create elegant lines of light. This enhances safety while adding a resort-like ambiance.
Even a simple birdbath can become a focal point. Use a small, waterproof well light to graze its texture from below.
Path lighting near a water's edge enhances the mystical feel. The reflections double the visual impact of your illumination.
Ambient and Mood Lighting: Creating Intimate Gathering Spaces
This is all about crafting a welcoming atmosphere for relaxation. Soft, diffuse light sources are key to avoiding harshness.
String light bulbs hung between trees or posts offer a romantic vibe. Their warm glow encourages conversation and lingering.
Single hanging bulbs inside lanterns provide focused pools of light. Hanging tree lanterns add whimsy and charm to a seating area.
For a clean look, use hidden fixtures that wash walls with a warm tone. Step and deck light pairs define the perimeter of a patio softly.
The goal is to make outdoor rooms feel cozy and enclosed. This extends your living space well into the evening hours.
Combine several of these creative ideas in your landscape. A layered plan feels professional and captivating.
Start with key architectural highlights and safe pathways. Then add layers of drama and ambient glow for a complete picture.
Integrating Smart Technology with Your Low Voltage System
Imagine your garden lights responding to your voice, schedule, and even your location—this is the power of smart integration. Modern systems connect your exterior illumination to your digital life.
This upgrade adds a layer of convenience and personalization. You move from manual control to automated ambiance.
The core of a smart setup is a dedicated hub. This device acts as the central command center.
The Hub and App: Controlling Lights from Your Phone
Systems like Philips Hue require a Bridge. This small box plugs into your router.
It creates a separate, secure wireless network using the Zigbee protocol. Your individual fixtures talk to the Bridge through this mesh.
Each smart product also acts as a signal repeater. This extends the network's range across your property.
A key rule is placement. Every fixture must be within 50 feet of another smart light or the Bridge itself.
This ensures a strong, reliable connection. The companion app on your smartphone is your control panel.
From the app, you can turn zones on or off with a tap. You can dim beams to set the perfect mood.
Group fixtures by area, like "Front Path" or "Backyard Trees." For color-changing products, you can select any hue from a palette.
Scheduling, Automation, and Voice Control
Set-and-forget scheduling is a major benefit. Program your system to turn on at sunset and off at sunrise automatically.
You can also set specific times, like 7 PM to 11 PM. This ensures your property is always illuminated when needed.
Automation connects your lights to larger smart home ecosystems. Sync them with Google Home, Amazon Alexa, or Apple HomeKit.
This enables hands-free voice commands. Simply say, "Hey Google, turn on the patio lights."
Create scenes that activate multiple groups at once. A "Welcome Home" scene could light the driveway, path, and entry.
Geofencing uses your phone's location. Your lights can turn on automatically as you arrive home.
They can also turn off after you leave. This adds both convenience and an element of security.
Before purchasing, check for system compatibility. Ensure the smart hub works with your chosen fixtures and your preferred voice assistant.
The initial setup involves connecting the hub and adding each light to the app. Take time to plan your fixture placement to maintain a strong mesh network.
With a robust setup, your outdoor area becomes an intelligent, responsive extension of your home.
Maintenance Tips to Keep Your Landscape Lights Shining Bright
A little seasonal attention keeps your yard's nighttime glow bright and reliable year after year. Your beautiful outdoor setup requires simple care to perform its best.
Just like any part of your home, these systems benefit from regular check-ups. A quick routine prevents small issues from becoming big problems.
Plan to inspect your entire setup at the start of each season. Spring and fall are ideal times for a thorough review.
This proactive approach ensures every beam shines as intended. It also extends the life of all your components.
Begin by cleaning each fixture's lens and housing. Dirt, pollen, and cobwebs can accumulate and dim the output.
Use a soft cloth and mild soapy water for the task. Ensure the power is off before you start cleaning.
Next, check every wire connection in the system. Look for signs of corrosion or a loose fit.
Verify that waterproof seals are intact and snug. This keeps moisture out and maintains safety.
Even long-lasting LED modules can eventually fail. Replace any burnt-out bulbs promptly to keep the scene consistent.
Most modern products have user-replaceable parts. Keep a few spare bulbs on hand for quick swaps.
Inspect the transformer and its connections carefully. Look for any wear, cracks, or signs of water intrusion.
Ensure the unit is mounted securely and remains protected from the elements. A well-placed transformer lasts for years.
Trim back plants and foliage growing near your fixtures. Overgrown branches can block beams and create shadows.
This also prevents physical damage to the housings. Keep a clear space around each light for optimal performance.
In snowy regions, winter requires special care. Consider removing path lights along driveways before the snow falls.
This prevents damage from snow plows or heavy ice. Store these products in a dry place until spring.
For permanent fixtures, brush off accumulated snow gently. This ensures the light can still shine through.
Following a consistent schedule makes upkeep easy. The table below outlines a simple plan to follow.
These simple steps protect your investment. They ensure your property always looks its best after dark.
A well-maintained system provides reliable safety and beauty. It continues to enhance your home's curb appeal for many seasons.
Safety First: Best Practices for Outdoor Electrical Projects
Even with user-friendly systems, respecting fundamental electrical safety rules is essential for every homeowner. A beautiful exterior illumination setup must be built on a foundation of secure practices.
While a 12-volt landscape system is inherently safer, caution is never optional. Following these guidelines protects your family, your property, and your investment.
Your first line of defense is a GFCI outlet. Always plug the transformer into a Ground Fault Circuit Interrupter receptacle.
This device instantly cuts power if it detects a fault. It prevents severe shock hazards in damp outdoor conditions.
Only use components specifically designed for exterior use. This includes the transformer, cables, and all fixtures.
Outdoor-rated products are built to withstand rain, sun, and temperature swings. They have seals to keep moisture away from electrical parts.
Proper cable burial prevents accidents and damage. Bury the main wire at least six inches deep.
You can also run it through a conduit for extra protection. This keeps it safe from shovels, lawnmowers, and garden tools.
Never overload your power supply. The transformer has a maximum wattage rating listed on its label.
Add up the wattage of all connected lights. Ensure the total is below the transformer's capacity, leaving a 20% buffer.
Always turn off the power at the circuit breaker before you work. This applies even when dealing with the low-voltage side.
It is the safest way to make connections or changes. Never assume a wire is safe to touch without verifying.
If any part of the project makes you uncomfortable, call a professional. A licensed electrician can handle connections to your home's main power.
This ensures everything meets local electrical codes. Your peace of mind is worth the consultation.
Following these steps lets you enjoy your stunning landscape lights with total confidence. Safety is the brightest feature of any well-designed system.
Budgeting for Your Project: Understanding Costs and Value
A clear budget plan turns your landscape lighting vision into a manageable reality. Knowing where your money goes helps you make smart choices.
Your total investment has several parts. Each component affects the final price and performance.
Fixtures are the most visible cost. Their price varies widely by style, material, and quality.
The transformer is another essential expense. You need one with enough power for all your products.
Wire, connectors, and optional smart controls add to the total. Planning ahead prevents surprises.
Look at the long-term picture. Modern LED systems use very little electricity.
This efficiency leads to noticeable savings on your power bill. The bulbs also last for years.
Your initial investment pays back in beauty and function. A well-lit yard feels larger and more inviting.
Professional-grade illumination boosts your home's curb appeal. It can increase property value significantly.
Buyers notice a finished, elegant exterior. This upgrade often offers a strong return on investment.
You have two main installation paths. Doing it yourself saves on labor costs.
A DIY project requires your time and effort. You must be comfortable with basic yard work and wiring.
Hiring a professional ensures expert design and code compliance. Labor can add $1,000 to $3,000 or more.
Start with a small, focused area if your budget is tight. Lighting a front walkway is a great first step.
You can expand the system season by season. Add spotlights for trees or deck lights later.
Higher-quality, commercial-grade fixtures cost more upfront. They offer superior durability and light output.
These products withstand harsh weather for decades. Their performance justifies the price for long-term owners.
Budgeting wisely lets you create a stunning nighttime scene without stress. Focus on value over the cheapest option.
Conclusion: Illuminating Your Home’s Best Features Every Night
With the right approach, your home can become a beacon of warmth and style every evening. A well-designed low-voltage system is safe, energy-efficient, and incredibly versatile. It transforms your outdoor areas into beautiful, usable extensions of your living space.
Remember the key steps. Understand your options, plan your layout, and choose the right fixtures. Install with care and maintain your lights regularly. This process rewards you with enhanced curb appeal and safer navigation after dark.
Use this guide as your roadmap. Take a look at your property tonight. Sketch a simple plan and take that first step. You can create your own stunning landscape lighting design with confidence.
FAQ
What makes a 12V or 24V system safer than standard outdoor power?
These systems operate at a significantly lower electrical potential, which greatly reduces the risk of severe shock. This safety feature allows for easier, more flexible installation without the need for deep burial of cables or complex conduit in most residential applications.
How do I know what size power supply unit I need for my project?
You need to total the wattage of all the fixtures you plan to connect. For example, if you have ten 4-watt LED path lights, that's 40 watts. Always choose a transformer with a wattage capacity at least 20% higher than your total to allow for future additions.
Can I mix different types of fixtures, like spotlights and path lights, on one transformer?
Absolutely. A single power supply can run multiple fixture types as long as the combined wattage doesn't exceed the transformer's capacity. This flexibility lets you create layered designs with uplights for trees, beams for pathways, and washes for walls all from one central hub.
What is the best way to highlight a large tree in my yard?
For dramatic effect, place a well light or a directional spotlight several feet away from the trunk, aiming upward to graze the bark and illuminate the canopy. Using a fixture with an adjustable head, like those from Volt or FX Luminaire, allows you to precisely frame the tree's best features.
Are these systems difficult to install for a DIY homeowner?
Most kits from brands like Ring or Hampton Bay are designed for DIY. The process typically involves mounting the transformer, laying direct-burial cable, and connecting plug-and-play fixtures. Basic hand tools and careful planning are the main requirements, making it an accessible weekend project.
How can I integrate smart controls with my existing landscape setup?
You can add smart functionality by replacing a standard transformer with a smart model or by plugging your current transformer into a smart outdoor plug. Brands like Philips Hue offer ecosystem products, while universal smart plugs from Kasa or Wyze work with most systems for scheduling and voice control via Alexa or Google Assistant.
What regular upkeep do the fixtures require to stay bright?
Simple maintenance keeps them shining. Periodically wipe lenses and housings with a damp cloth to remove dirt, pollen, and debris that can dim the output. In autumn, clear fallen leaves from around path lights and well lights to prevent moisture buildup and ensure proper heat dissipation for long LED life.